
If you have just joined us on this little adventure of "Bring on Spring!" for WeScrap.com, you may want to start at the beginning, here; http://www.creativecraftsandstickers.com/
As part of the WeScrap Inspiration Team, we have all decided that with all the months of snow and ice that we'd "Bring on Spring!" a little early this year! Hop along with the entire WeScrap iTeam to see what each of the iTeam has created!
Here's our blog hop rotation for today:
Creative Crafts and Stickers
Sarah Nolan
Michelle Galloway
Calia Yang
Laura Gilhuly
Tara Thynne **You are here**
Jacquelin Green
Jen Benoit
Avina Lim
Guest iTeam, Teresa Hord
Allison Cope (http://yourmemoriescanada.blogspot.com/)
Now I'd like to share my Spring inspired project with you!!
I used the cool new weScrap kit that is now available to buy: Late Nights

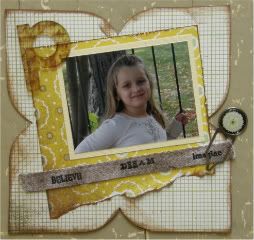
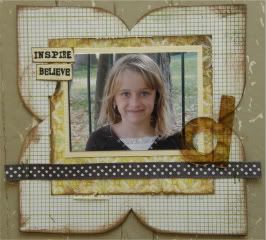
I took apart the Basic Grey Chipboard Album and made some fun magnets for my fridge!
Gather up your supplies:
Chipboard Shapes
Patterned Paper
ribbon, buttons, pins
stamps
adhesives
ink
scissors
alphas
magnets (purchased at the dollar store)
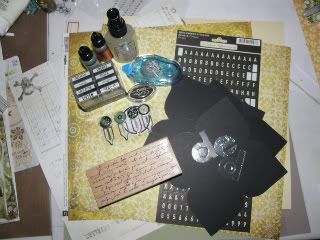
1. Trace your shape onto your patterned paper and cut out. Adhere to the chipboard using liquid adhesive. (I used Zip Dry). You must use a good liquid adhesive because you are going to hang them on your fridge and gravity will come to be your enemy. Ink the edges if desired.
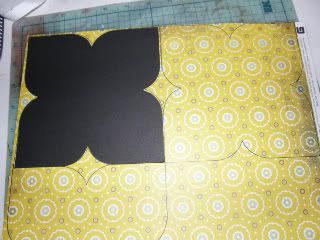
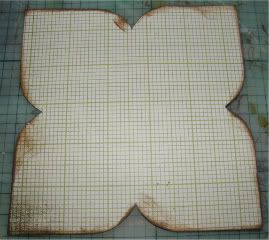
2. Add some coordinating paper to your project and your photo. Adhere where desired.
3. Time to embellish it with some ribbons, buttons, pins, flowere.... whatever you would like to use.
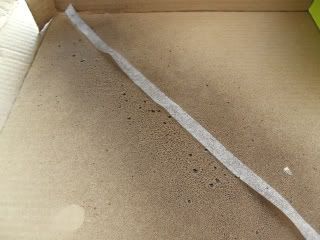
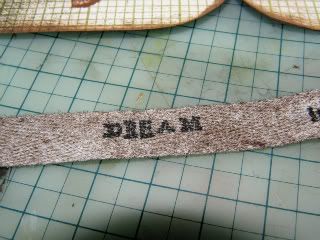
4. I used the white ribbon that is included in this kit and sprayed it with Tattered Angels Glimmer Mist in Tattered Leather. Once it was dry I stamped some words on to it and attached it to Paige's layout.
5. I used alcohol inks on the acrylic letters and attached them to the magnets. **As seen on the CCAS Blog.
6. Not use your strong liquid adhesive and attach your magnet to the back of the chipboard.
VOILA!! Now you have a pretty creation to adorn your fridge. :)
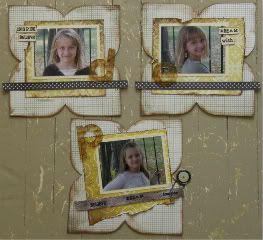
Paige:
Emmy:

DD:
Not only do we have some fabulous projects to share today but you also have a chance to win a PRIZE! By leaving a comment on EACH iTeam member's blog today, you have a chance to win $100 worth of scrappy goodies! Yup... that's $100 of scrappy goodness for your stash! You have until Wednesday March 10th to leave your comments for a chance. Good luck!
**RAK ALERT: everyone who comments today will earn a ballot for my monthly blog draw. I have a wonderful collection of new CHA goodies to giveaway. Did someone say Crate??? Yep, $50.00 worth of CHA Goodies! If you want more chances to win just play along and complete any challenges or games I post for the month of March!! Follow my blog for even more chances!**
Now.... find out what **Jacquelin** has created to inspire you today!
Have Fun!
~Tara~
As part of the WeScrap Inspiration Team, we have all decided that with all the months of snow and ice that we'd "Bring on Spring!" a little early this year! Hop along with the entire WeScrap iTeam to see what each of the iTeam has created!
Here's our blog hop rotation for today:
Creative Crafts and Stickers
Sarah Nolan
Michelle Galloway
Calia Yang
Laura Gilhuly
Tara Thynne **You are here**
Jacquelin Green
Jen Benoit
Avina Lim
Guest iTeam, Teresa Hord
Allison Cope (http://yourmemoriescanada.blogspot.com/)
Now I'd like to share my Spring inspired project with you!!
I used the cool new weScrap kit that is now available to buy: Late Nights

I took apart the Basic Grey Chipboard Album and made some fun magnets for my fridge!
Gather up your supplies:
Chipboard Shapes
Patterned Paper
ribbon, buttons, pins
stamps
adhesives
ink
scissors
alphas
magnets (purchased at the dollar store)

1. Trace your shape onto your patterned paper and cut out. Adhere to the chipboard using liquid adhesive. (I used Zip Dry). You must use a good liquid adhesive because you are going to hang them on your fridge and gravity will come to be your enemy. Ink the edges if desired.


2. Add some coordinating paper to your project and your photo. Adhere where desired.
3. Time to embellish it with some ribbons, buttons, pins, flowere.... whatever you would like to use.
4. I used the white ribbon that is included in this kit and sprayed it with Tattered Angels Glimmer Mist in Tattered Leather. Once it was dry I stamped some words on to it and attached it to Paige's layout.
5. I used alcohol inks on the acrylic letters and attached them to the magnets. **As seen on the CCAS Blog.
6. Not use your strong liquid adhesive and attach your magnet to the back of the chipboard.
VOILA!! Now you have a pretty creation to adorn your fridge. :)

Paige:

Emmy:

DD:

Not only do we have some fabulous projects to share today but you also have a chance to win a PRIZE! By leaving a comment on EACH iTeam member's blog today, you have a chance to win $100 worth of scrappy goodies! Yup... that's $100 of scrappy goodness for your stash! You have until Wednesday March 10th to leave your comments for a chance. Good luck!
**RAK ALERT: everyone who comments today will earn a ballot for my monthly blog draw. I have a wonderful collection of new CHA goodies to giveaway. Did someone say Crate??? Yep, $50.00 worth of CHA Goodies! If you want more chances to win just play along and complete any challenges or games I post for the month of March!! Follow my blog for even more chances!**
Now.... find out what **Jacquelin** has created to inspire you today!
Have Fun!
~Tara~














FANTASTIC layout!! Love your step by step. You got my creative juices flowing!! (thank-you!!!) I'll be back for sure!
ReplyDeleteGreat projects Tara, love what you did!!
ReplyDeleteWhat a great idea! Turned out beautifully! Thanks for the tutorial!
ReplyDeleteLove that you made magnets! Fabulous idea!
ReplyDeleteOooh...That's awesome!
ReplyDeleteTerrific job!!!
ReplyDeletewow! what a great idea! beautiful!!
ReplyDeleteTara-- WOW! Very cool! I love how you thought to make magnets! I love this kit-- I actually just bought it today! ;)
ReplyDeleteThanks for sharing! =)
Very nice! Great project!
ReplyDeleteI love this book!! Your tips are very helpful!!
ReplyDeleteThanks so much and have a great day!!
AWESOME project Tara! Thank you for the step by step photos!!!
ReplyDeletenice, simple yet effective. Love what you did with your LO
ReplyDeleteThat is an awesome idea! My fridge is the next victim of my scrappiness!
ReplyDeletei love the idea of making the fridge magnets, that is a totally cool idea!
ReplyDeleteI love this layout! Thanks for the instructions.
ReplyDeletegorgeous projects Tara
ReplyDeleteWOW stunning, love the technique... just an awesome project Tara!!
ReplyDeleteGreat idea, thanks for sharing. Love how they turned out
ReplyDeleteGreat project tuitorial and as always, beautiful girls. TFS
ReplyDeleteLove those magnets! Very cool!
ReplyDeleteAdorable project!!
ReplyDeleteGreat layout, beautiful kids too!
ReplyDeleteWhat a great idea!! Love what you created :)
ReplyDeleteAwesome Tara, love that idea, Love the kit too! I love how you stamped on the ribbon, so cleaver you are!
ReplyDeleteLOVE that you made them magnets Tara!! Cool!!
ReplyDeleteYou never cease to amaze me Tara!
ReplyDeleteThe magnets are a fantastic idea.
Great technique. Thanks for sharing
ReplyDeleteGreat project, loved how you gave us a step by step so that we can do this project also.
ReplyDeleteLove your project...now following you! Thanks for the chance to win!
ReplyDeleteomgoodness
ReplyDeletewhat a great way to use that album
very original love love love your creation!!!!!!!
hugs
me
ADorable projects Tara! Will each girl use hers to hold up her favorite work, grade, etc? I just figured out how Sarah kept making that shape--the chipboard album!!! NOw I need one! LOL
ReplyDeleteLove what you did with the ribbon, very creative
ReplyDeleteLove those projects!
ReplyDeleteVery nice layout! I love the distressing!:)
ReplyDeleteFabulous idea! Thank you for sharing.
ReplyDeleteBeautiful projects!!! I love the tutorial for the ribbon...what a great idea!!
ReplyDeleteHi Tara,
ReplyDeletegreat idea for a nice use of a mini album!!
I am your newest follower :)
Thanks, Susan
http://piecesoffatesusan.blogspot.com
PS would love some info on why it is no longer the NSA, and info about the monthlky kits
Super cute magnets, I really love the idea. I am now one of your followers and can't wait to see what you will be creating next!
ReplyDelete-Cher
So cute.. Love what you did.. it is such a great idea.. Thanks for sharing..
ReplyDeleteLove the magnets!!!
ReplyDeleteWOW thanks for the tutorial Tara that was brilliant. I miss you girl!!!
ReplyDeleteWow! Amazing projects Tara! Beautiful!
ReplyDeleteLove the idea of the magnets. I hope my creative juices will be flowing by the time I'm finished visiting all the blogs.
ReplyDeleteWhat a great idea Tara!!!! Beautiful work!
ReplyDeleteThis fabulous Tara - and a really great tutorial!!!! Thanks so much!
ReplyDeleteLOVE!!
ReplyDeleteGreat layout.
ReplyDeleteWow-great idea for the little album-I love your kit-think i'll be sure to purchase it-thanks so much!
ReplyDeleteby the way-I am now a follower too!!
ReplyDeleteLots of great techniques!
ReplyDeleteOkay, I need to get back on the bandwagon and do your challenges!! So glad your dd surgery went well!!
ReplyDelete